Below are the instructions to setup your Flame Boss model 500, 300, or 200V2 controllers to your WiFi network using your iOS mobile device. Please note: If you are a FB300 or FB200VS user, enter 3A before entering the serial number from the back of your controller.
See the Steps below to get connected.
Flame Boss Installation Instructions
- Be sure your controller is in Access Point Mode
- FB500 > press the Next button > WiFi > Next > WiFi Mode > press up button to select Access Point > Next
- FB300s,200V2s > press Menu > WiFi Menu [Skip] > use up button to select [Enter] > then Menu > WiFi Mode > press up button to select Access Point > then Menu
- Download the Flame Boss App from your app store
- Then open up the Flame Boss mobile app
- Allow all permissions asked from the app
- Select "Add New" at the top of the Devices page
- Enter your Flame Boss 500 Serial number #######
- Then select, Join FB Wi-Fi
- You will then receive a Success message letting you know the device is connected to your phone
- You will then be taken back to your Devices tab
- Lettering under your Flame Boss name will turn from gold to blue
- You will then see a Setup WiFi button pop up
- Select it and then select your 2.4 GHz WiFi network name for the list
- Then enter the password for it
- You will receive the message that your Wifi credentials have been sent.
- You will be taken back to the Devices tab
Once the Flame Boss is connected to your WiFi network, it will show as the screenshot provided below shows with a status of Cloud: Ready.
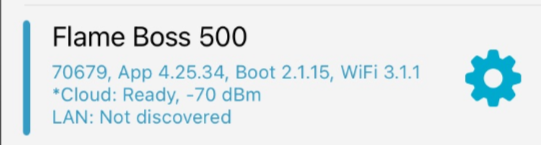
*If you do not see your device show online as shown below, check the password and try again by placing your Flame Boss 500 back to AP mode. Select Next > Then scroll down to WiFi and select Next > Select Next until you see the WiFi Mode setting > select the up or down button to select Access Point > then select next.
Please let us know if further assistance is needed.